Science Jubilee Primer#
Last Edited: Blair, 2023.11.13
This page provides an introduction to key concepts for using science_jubilee. This primer is by no means exhaustive, but provides helpful background information for newcomers to Jubilee. If you’re already familiar with computer-controlled machines, or if you want to learn how to use the science_jubilee codebase, feel free to skip ahead to the machine_intro.
GCode#
GCode (or ‘geometry code’) is the standard language used by CNC machines like Jubilee. We can use GCode to move the machine around! By default, the machine will use millimeter for its units. To move to the (x, y, z) position (100mm, 50mm, 200mm) using GCode, we can write:
G1 X100 Y50 Z200 ; move the the position (100, 50, 200)
where G1 is the command for a ‘linear move’. Everything after the semicolon is a comment and is ignored by the machine. GCode is used in tandem with M-codes (or ‘miscellaneous codes’) which control non-movement related functions. For example, the command M114 will ask the machine to return its current position.
Different machines might use slightly different sets of GCode. This depends on the control board which the machine uses (which turns GCode commands into machine movements) and the firmware which the control board uses. Jubilee uses the Duet3D control board, which in turn runs RepRapFirmware. For a complete list of G and M Codes that can be used with Jubilee, take a look at the Duet3D GCode Dictionary. Already, you might see how tedious it would be to plan many movements using GCode directly; science_jubilee allows you to use Python code to build up many commands.
Coordinate System#
To send the machine to a position like we did above, the machine has to know where it is. This is accomplished by ‘homing’ the machine when you first power it on. Jubilee has 4 axes by default: the X, Y, and Z dimensional axes, and the toolchanger U axis. The X and Y axis directions are shown in the diagram below:
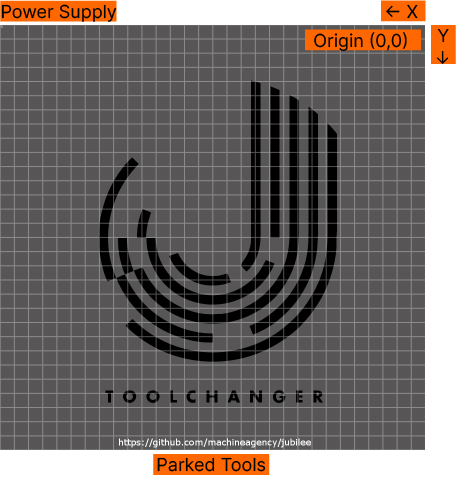
Jubilee X & Y axis directions, modified from the Jubilee repo#
The Z axis 0 position is the platforms highest position; the positive Z direction therefore moves the platform downwards. Each axis has a limit switch positioned at its origin. When we home an axis, the machine will move that axis until the switch is activated, at which point it is ‘homed’.
Absolute and Relative Positioning#
Our GCode movement commands can be interpreted as absolute or relative moves by the machine. In absolute positioning mode, the machine will move relative to the origin. In relative positioning mode, the machine will move relative to its last position. We can change our positioning mode using the G90 command for absolute and G91 for relative. For example, say we start at the origin (0,0,0). Consider the following move commands:
                 ; to start, we are at the origin (0,0,0)
G90              ; use absolute positioning
G1 X100 Y50 Z200 ; move to the absolute position (100, 50, 200)
G91              ; use relative positioning
G1 X100          ; move 100mm in X relative to the last position
In this example, the machine will end up at the position (200, 50, 200). Note that all subsequent commands will be in relative mode unless we explicitly return to absolute mode with a G90 command. Swapping back and forth between modes is handled by science_jubilee, but it’s useful to understand the underlying GCodes as you get to know your machine.
Toolchanging#
When you configure tools for use on the machine, each will have a unique number. We can swap between tools with T commands:
T1  ; pickup tool 1
T2  ; return tool 1, pickup tool 2
T2  ; does nothing, since tool 2 is already selected
T-1 ; return the current tool
Behind the scenes, these T commands are running several other macros, or short pre-written GCode programs. The complete order of operations can be found in the Duet GCode Dictionary :
If another tool is already selected, run macro
tfree#.gwhere#is the number of that tool.If another tool is already selected, deselect it and set its heaters to their standby temperatures (as defined by the
Rparameter in the most recentG10/M568command for that tool)Run macro
tpre#.gwhere#is the number of the new toolSet the new tool to its operating temperatures specified by the
Sparameter in the most recentG10/M568command for that toolRun macro
tpost#.gwhere#is the number of the new tool. Typically this file would contain at least aM116command to wait for its temperatures to stabilise.Apply any X, Y, Z offset for the new tool specified by
G10Use the new tool.
The tfree, tpre, and tpost macros are edited for each tool when you first configure them (see the Building a Tool postrequisites). With respect to coordinate systems, note the second to last bullet point above: the 0 position for any new tool depends on your tool calibration! Different tools have different dimensions, and when we pickup a tool its offsets are automatically applied. Note that this means we can move to a ‘negative’ position when we pick up a tool: the firmware will ensure that the we only move within the 300x300x300mm build volume of Jubilee, but this ignores the tool offsets. For example, if tool 1 has a Z offset of 50, this means we can move from Z-50 to Z250 to cover the full 300mm range of Jubilee. While science_jubilee has built-in functionality to prevent collisions, it is important to consider tool offsets when developing workflows.